Paytm SoundBox (Part 1)
Analysis of the PayTM Soundbox
Background
Online payments in India have taken a massive boost ever since Unified Payment Interface (UPI) was introduced in 2016. In addition to NEFT, IMPS and RTGS, and the exception of private “wallet” providers such as Paytm, people were now able to transfer money however small the amount be, instantly, just by scanning QR Codes, resulting in the money instantly getting debited/credited to their bank accounts.
The introduction of UPI was fundamentally a change to the Indian payments system and has transformed the way people view cash. People no longer needed to look for exact cash change and could pay in arbitrary amounts to arbitrary people.
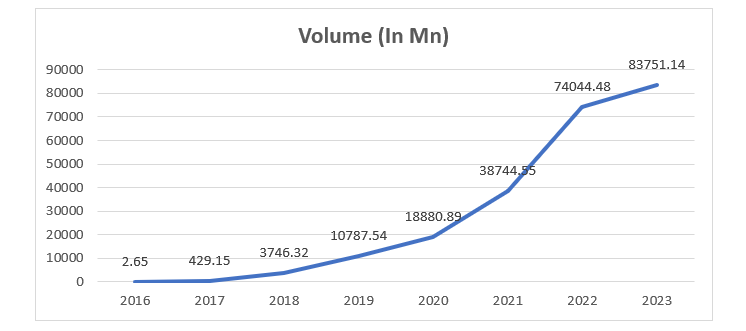
However, naturally, this led to some issues, mainly with the verification of the authenticity of a payment. Merchants who transacted huge volumes of amounts daily were overwhelmed with the number of credit SMS, or checking their account statements.
This called for the introduction of a mechanism which could, in real-time, convey the authenticity of a transaction to a merchant in the lowest time possible.
One of those solutions was the SoundBox, first developed by PayTM, and followed by PhonePe and others.
The SoundBox was a revolutionary product that went popular with Indian merchants in no time. Over time, several revised versions of the SoundBox with added functions were released, however the fundamental design remains the same.
The SoundBox consists of a QR Code, which resolves to a unique UPI URL (with the upi:// prefix) per merchant, which is meant to be scanned by the customer. A SIM (3G/4G) connected to PayTM’s servers to fetch UPI transactions, a PCB, and a speaker which spoke aloud the receipt of a payment along with the amount sent.
Into the Soundbox
The following findings are based on the product called PayTM SoundBox 3.0 4G.
Before ordering a SoundBox for myself, I looked up information online on the internals of one. Luckily, a blog by Pallav Aggarwal details the teardown of the SoundBox 2.0, and has some research on the components on the PCB. However, no more analysis on the PCB has been performed publicly. This post tries to detail some of the internals of how the SoundBox functions at the software level.
Opening up the SoundBox is relatively simple, the speaker and PCB is housed inside a plastic casing along with an antenna, held together by a few screws. An SD Card (?) and a SIM is attached to the back of the PCB.
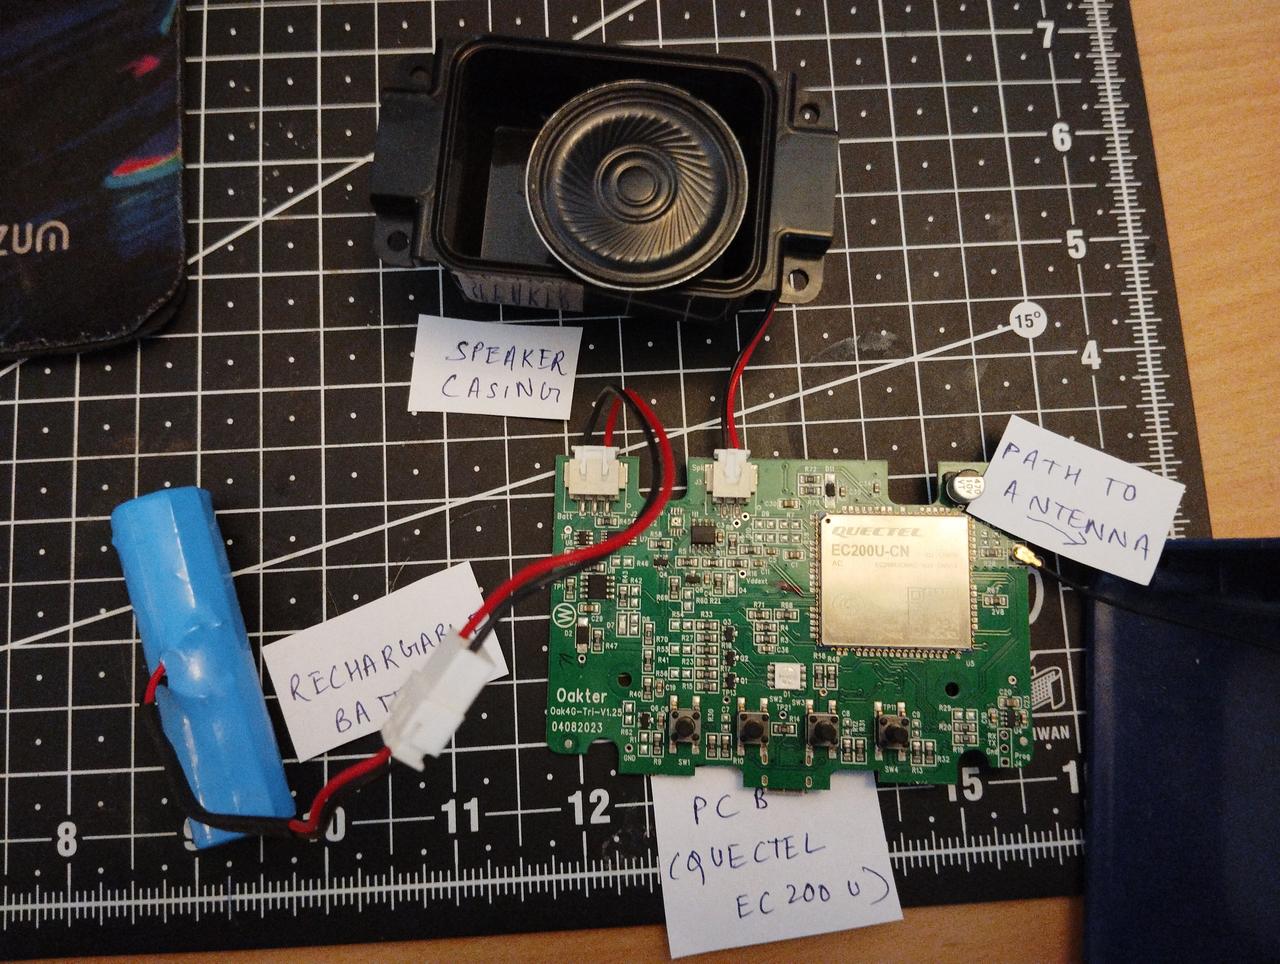
The PCB for SoundBox 3.0 appears to be the same as the 2.0 4G on the surface with only the informative version differing (V1.25 - 3.0 and V1.08 - 2.0), however there might be design variations which I have not taken a look at, and are out of the scope and relevance of this post.
The brain of the PCB is the Quectel EC200U (CN Variant) which is described as “a series of the latest LTE Cat 1 modules optimised specially for M2M and IoT applications”. The CN specialisation just pertains to the LTE frequency band regulations in the South Asian regions.
The EC200U chip here not only handles the LTE operations but also everything else and functions as the CPU on this board.
SD Card
Besides the EC200U Datasheet, not much can be known about the SoundBox simply by “looking” at it. A way to communicate with the PCB is needed.
The obvious entry point seems to be the SD card. Although no binaries are found, there seem to be all the necessary audio files responsible for announcing the payment receipt, which can be downloaded from here.
In addition, there are a few non-verbose log files that reveal close to nothing about the actual software on the chip.
A config file is also located in the SD Card which contains a few endpoints for OTA updates. However, the exact usage of these endpoints cannot be derived just from the information in here, we need to somehow dump the firmware used on the chip, and is discussed in part 2.